
joaopaulolndev
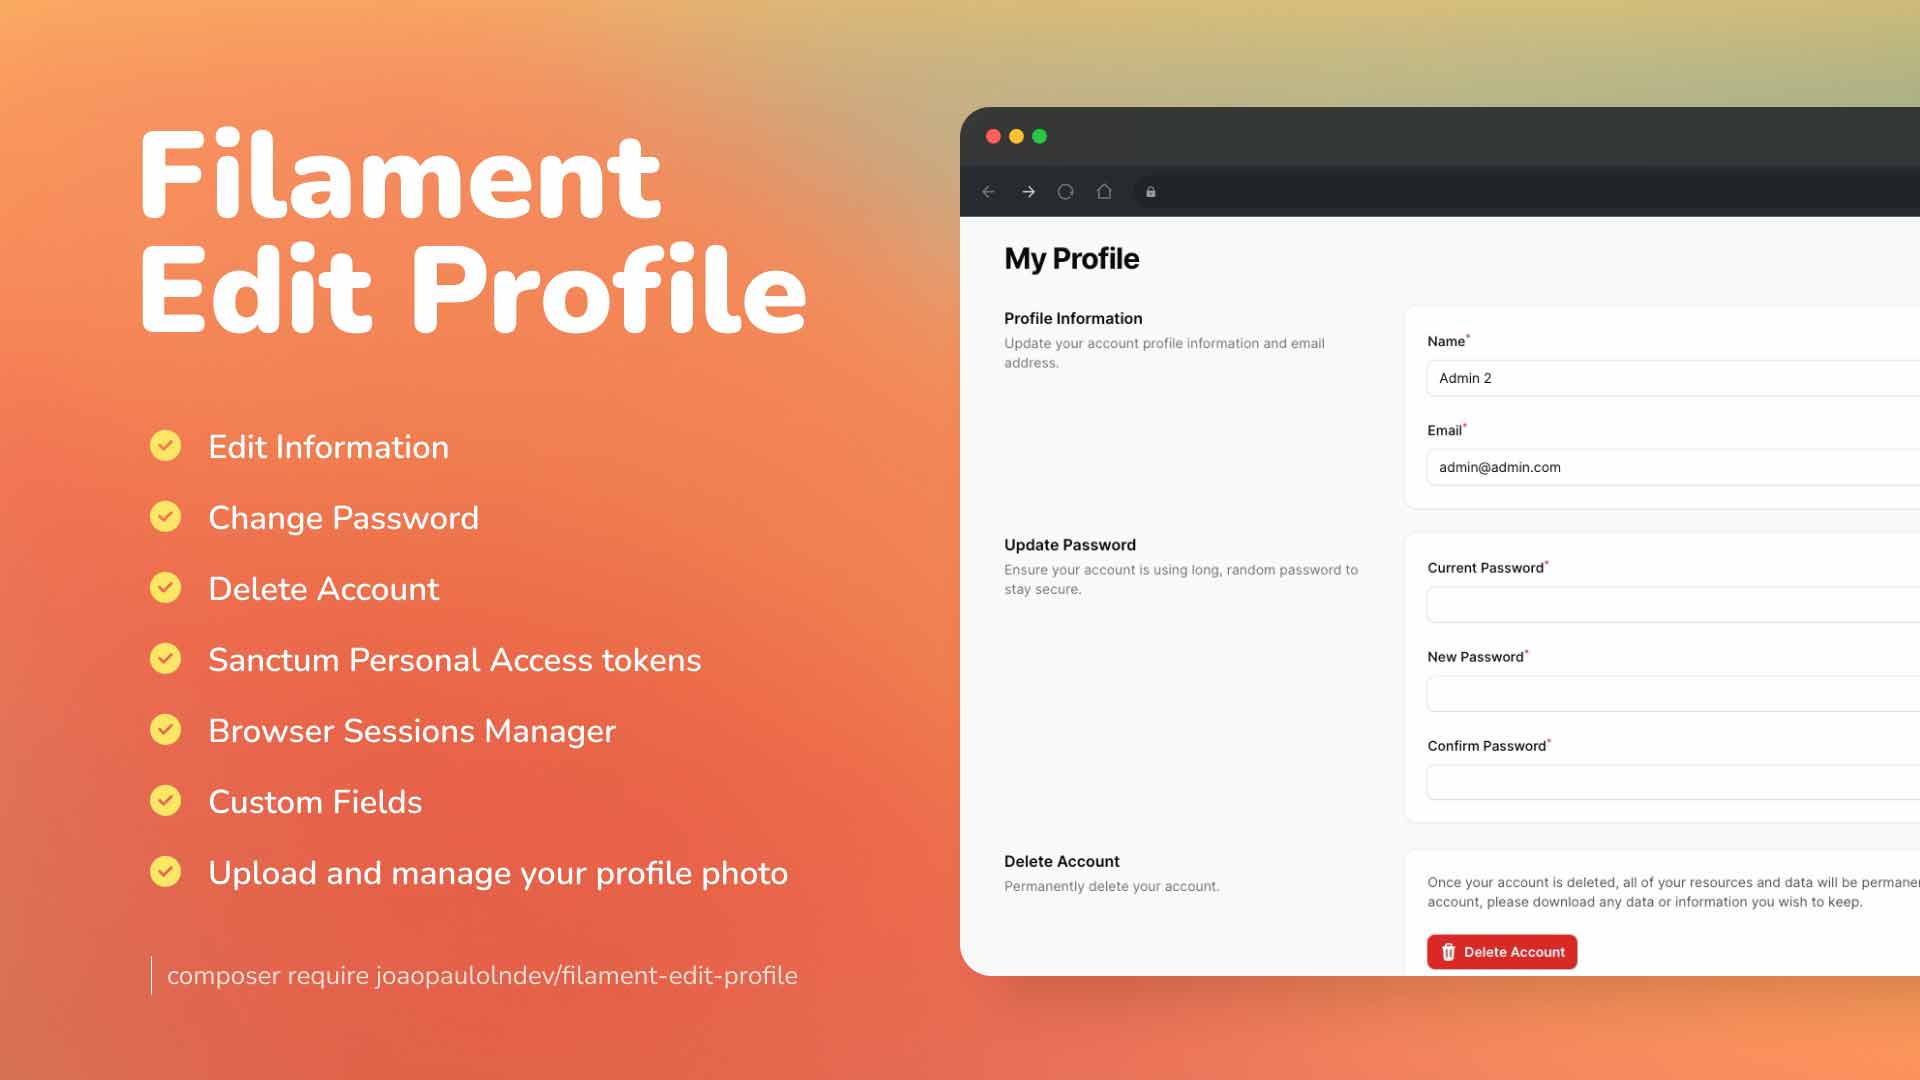
Filament package to edit profile


The Filament library is a user-friendly tool that simplifies profile editing, offering an intuitive interface and robust features to easily customize and manage user information.
| Package Version | Filament Version |
|---|---|
| 1.x | 3.x |
| 2.x | 4.x |
You can install the package via composer:
composer require joaopaulolndev/filament-edit-profile:^2.0
Filament V3 - if you are using Filament v3.x, you can use this section
You can publish and run the migrations with:
Optionally, you can publish the views using
php artisan vendor:publish --tag="filament-edit-profile-views"
Optionally, you can publish the translations using
php artisan vendor:publish --tag="filament-edit-profile-translations"
You can publish and run all the migrations with:
php artisan vendor:publish --tag="filament-edit-profile-migrations"
php artisan migrate
You can publish the config file with:
php artisan vendor:publish --tag="filament-edit-profile-config"
Add in AdminPanelProvider.php
use Joaopaulolndev\FilamentEditProfile\FilamentEditProfilePlugin;

->plugins([
    FilamentEditProfilePlugin::make()
])
if you want to show for specific parameters to sort, icon, title, navigation group, navigation label and can access, you can use the following example:
use Joaopaulolndev\FilamentEditProfile\FilamentEditProfilePlugin;

 ->plugins([
     FilamentEditProfilePlugin::make()
        ->slug('my-profile')
        ->setTitle('My Profile')
        ->setNavigationLabel('My Profile')
        ->setNavigationGroup('Group Profile')
        ->setIcon('heroicon-o-user')
        ->setSort(10)
        ->canAccess(fn () => auth()->user()->id === 1)
        ->shouldRegisterNavigation(false)
        ->shouldShowEmailForm()
        ->shouldShowLocaleForm(
            options: [
                'pt_BR' => '🇧🇷 Português',
                'en' => '🇺🇸 Inglês',
                'es' => '🇪🇸 Espanhol',
            ],
        )
        ->shouldShowThemeColorForm()
        ->shouldShowDeleteAccountForm(false)
        ->shouldShowSanctumTokens()
        ->shouldShowMultiFactorAuthentication()
        ->shouldShowBrowserSessionsForm()
        ->shouldShowAvatarForm()
        ->customProfileComponents([
            \App\Livewire\CustomProfileComponent::class,
        ])
 ])
Optionally, you can add a user menu item to the user menu in the navigation bar:
use Filament\Actions\Action;
use Joaopaulolndev\FilamentEditProfile\Pages\EditProfilePage;

->userMenuItems([
    'profile' => Action::make('profile')
        ->label(fn() => auth()->user()->name)
        ->url(fn (): string => EditProfilePage::getUrl())
        ->icon('heroicon-m-user-circle')
        //If you are using tenancy need to check with the visible method where ->company() is the relation between the user and tenancy model as you called
        ->visible(function (): bool {
            return auth()->user()->company()->exists();
        }),
])
If needed you can define the disk and visibility of the avatar image. In the config file add the following:
config/filament-edit-profile.php
return [
    'disk' => env('FILESYSTEM_DISK', 'public'),
    'visibility' => 'public', // or replace by filesystem disk visibility with fallback value
];
![]() Show the user avatar form using
Show the user avatar form using shouldShowAvatarForm(). This package follows the Filament user avatar to manage the avatar.
To show the avatar form, you need the following steps:
php artisan vendor:publish --tag="filament-edit-profile-avatar-migration"
php artisan migrate
protected $fillable = [
    'name',
    'email',
    'password',
    'avatar_url', // or column name according to config('filament-edit-profile.avatar_column', 'avatar_url')
];
use Filament\Models\Contracts\HasAvatar;
use Illuminate\Support\Facades\Storage;

class User extends Authenticatable implements HasAvatar
{
    // ...
    public function getFilamentAvatarUrl(): ?string
    {
        $avatarColumn = config('filament-edit-profile.avatar_column', 'avatar_url');
        return $this->$avatarColumn ? Storage::url($this->$avatarColumn) : null;
    }
}
->shouldShowAvatarForm(
    value: true,
    directory: 'avatars', // image will be stored in 'storage/app/public/avatars
    rules: 'mimes:jpeg,png|max:1024' //only accept jpeg and png files with a maximum size of 1MB
)
php artisan storage:linkShow the user locale form using shouldShowLocaleForm().
To show the locale form, you need the following steps:
php artisan vendor:publish --tag="filament-edit-profile-locale-migration"
php artisan migrate
->shouldShowLocaleForm(
    options: [
        'pt_BR' => '🇧🇷 Português',
        'en' => '🇺🇸 Inglês',
        'es' => '🇪🇸 Espanhol',
    ],
)
protected $fillable = [
    'name',
    'email',
    'password',
    'locale', // or column name according to config('filament-edit-profile.locale_column', 'locale')
];
Show the user theme_color form using shouldShowThemeColorForm().
To show the theme_color form, you need the following steps:
php artisan vendor:publish --tag="filament-edit-profile-theme-color-migration"
php artisan migrate
->shouldShowThemeColorForm()
protected $fillable = [
    'name',
    'email',
    'password',
    'theme_color', // or column name according to config('filament-edit-profile.theme_color_column', 'theme_color')
];
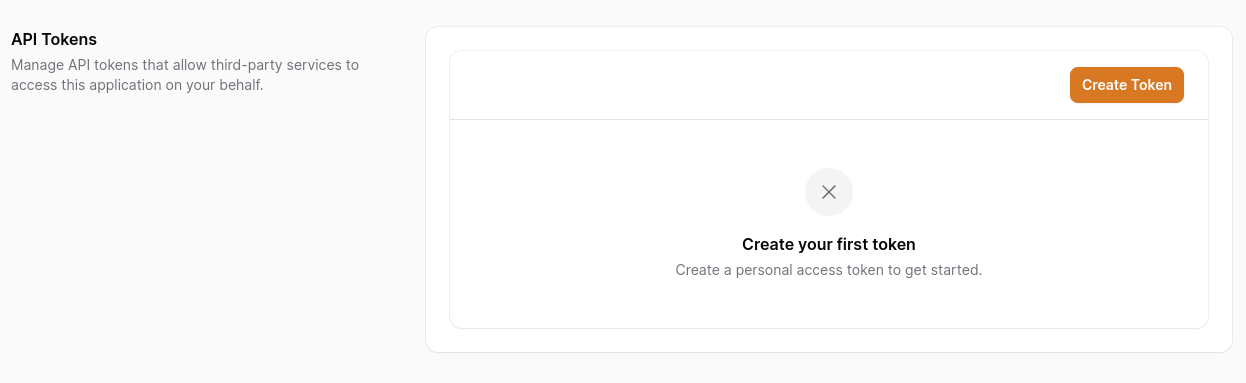
Show the Sanctum token management component:
Please review Laravel Sanctum Docs
You may install Laravel Sanctum via the install:api Artisan command:
php artisan install:api
Sanctum allows you to issue API tokens / personal access tokens that may be used to authenticate API requests to your application. When making requests using API tokens, the token should be included in the Authorization header as a Bearer token.
use Laravel\Sanctum\HasApiTokens;

class User extends Authenticatable
{
    use HasApiTokens, HasFactory, Notifiable;
}
If you want to control access, you can use condition, passing Closure or Boolean
Sanctum allows you to assign "abilities" to tokens. by default we have ['create', 'view', 'update', 'delete'] use permissions to customize
 ->plugins([
    FilamentEditProfilePlugin::make()
        ->shouldShowSanctumTokens(
            condition: fn() => auth()->user()->id === 1, //optional
            permissions: ['custom', 'abilities', 'permissions'] //optional
        )
 ])
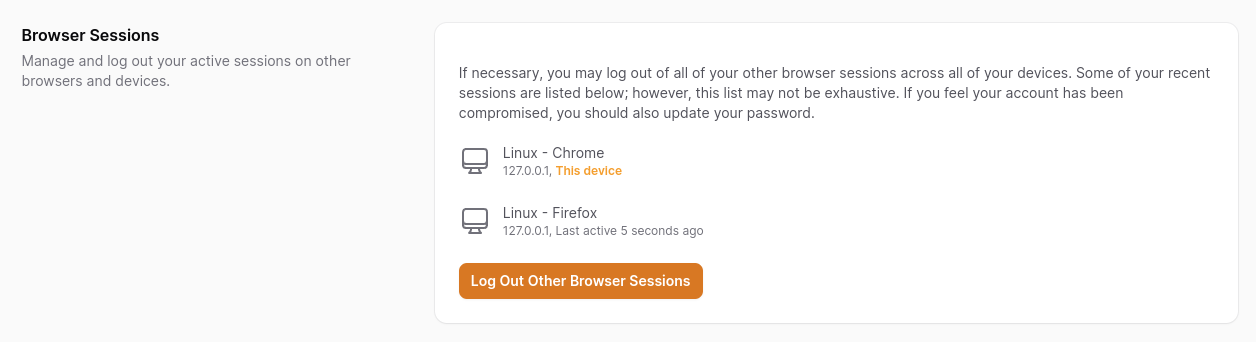
To utilize browser session, ensure that your session configuration's driver (or SESSION_DRIVER environment variable) is set to database.
SESSION_DRIVER=database
If you want to control access or disable browser sessions, you can pass a Closure or Boolean
 ->plugins([
    FilamentEditProfilePlugin::make()
        ->shouldShowBrowserSessionsForm(
            fn() => auth()->user()->id === 1, //optional
                //OR
            false //optional
        )
 ])
This plugin integrates with Filament's native Multi-Factor Authentication (MFA) system, allowing your users to manage their MFA settings directly from the profile edit page.
For the MFA functionality to be available on the profile page, you must first set up MFA in your Filament panel by following the official documentation.
This typically involves running a database migration and adding the TwoFactorAuthenticatable trait to your User model. You can find the detailed instructions at the link below:
➡️ Official Filament MFA Documentation
After setting up MFA in your project, the MFA section will be displayed by default for all users. However, this plugin provides a method to dynamically control who can see and manage the MFA options.
In your panel provider file (usually app/Providers/Filament/AdminPanelProvider.php), you can use the shouldShowMultiFactorAuthentication() method in two ways:
You can pass a Closure that returns true or false. The MFA section will only be displayed if the condition is met. In the example below, only the user with ID 1 will be able to see the MFA options.
 ->plugins([
    FilamentEditProfilePlugin::make()
        ->shouldShowMultiFactorAuthentication(
            // The section will only be visible to the user with ID 1.
            fn() => auth()->user()->id === 1, //optional
                //OR
            false //optional
        )
 ])
If you want to hide the MFA section for all users through the profile page, simply pass false as the argument.
 ->plugins([
    FilamentEditProfilePlugin::make()
        ->shouldShowMultiFactorAuthentication(false)
 ])
Note: If the
shouldShowMultiFactorAuthentication()method is not called, the default behavior is to display the MFA section for all users (equivalent to passingtrue), provided that the required setup has been completed correctly.
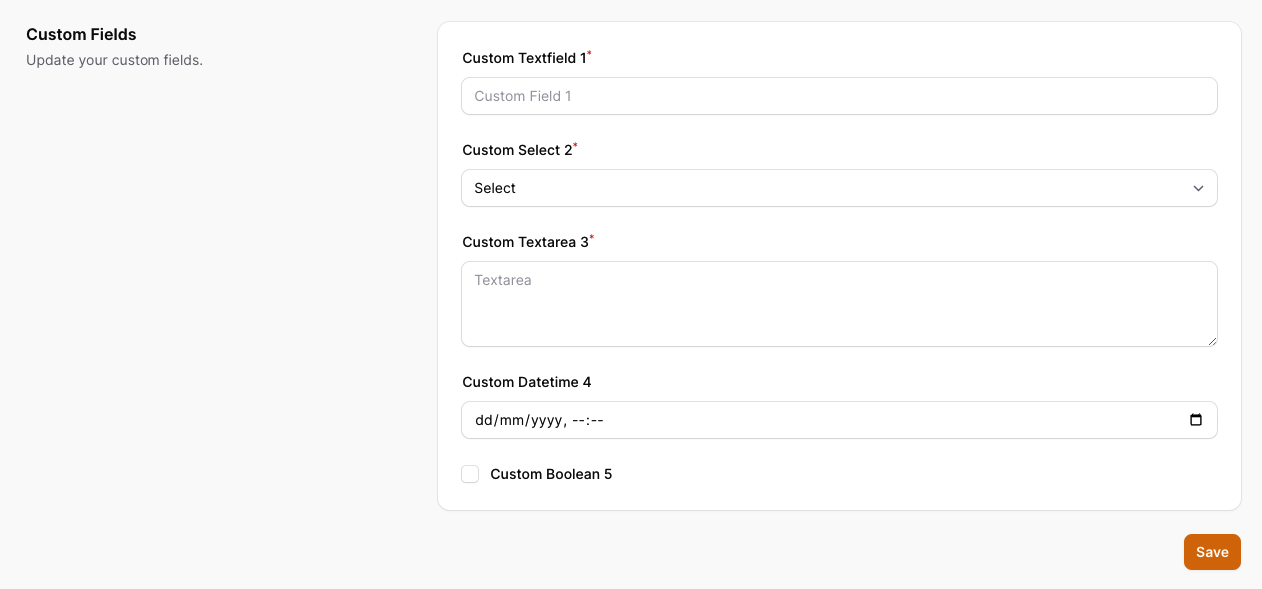 Optionally, you can add custom fields to the form.
To create custom fields you need to follow the steps below:
Optionally, you can add custom fields to the form.
To create custom fields you need to follow the steps below:
php artisan vendor:publish --tag="filament-edit-profile-custom-field-migration"
php artisan migrate
protected $fillable = [
    'name',
    'email',
    'password',
    'custom_fields',
];
protected function casts(): array
{
    return [
        'email_verified_at' => 'datetime',
        'password' => 'hashed',
        'custom_fields' => 'array'
    ];
}
php artisan vendor:publish --tag="filament-edit-profile-config"
config/filament-edit-profile.php to add the custom fields to the form as example below:<?php
return [
'show_custom_fields' => true,
'custom_fields' => [
'custom_field_1' => [
'type' => 'text', // required
'label' => 'Custom Textfield 1', // required
'placeholder' => 'Custom Field 1', // optional
'id' => 'custom-field-1', // optional
'required' => true, // optional
'rules' => [], // optional
'hint_icon' => '', // optional
'hint' => '', // optional
'suffix_icon' => '', // optional
'prefix_icon' => '', // optional
'default' => '', // optional
'column_span' => 'full', // optional
'autocomplete' => false, // optional
],
'custom_field_2' => [
'type' => 'password', // required
'label' => 'Custom Password field 2', // required
'placeholder' => 'Custom Password Field 2', // optional
'id' => 'custom-field-2', // optional
'required' => true, // optional
'rules' => [], // optional
'hint_icon' => '', // optional
'hint' => '', // optional
'default' => '', // optional
'column_span' => 'full',
'revealable' => true, // optional
'autocomplete' => true, // optional
],
'custom_field_3' => [
'type' => 'select', // required
'label' => 'Custom Select 3', // required
'placeholder' => 'Select', // optional
'id' => 'custom-field-3', // optional
'required' => true, // optional
'options' => [
'option_1' => 'Option 1',
'option_2' => 'Option 2',
'option_3' => 'Option 3',
], // optional
'selectable_placeholder' => true // optional
'native' => true // optional
'preload' => true // optional
'suffix_icon' => '', // optional
'default' => '', // optional
'searchable' => true, // optional
'column_span' => 'full', // optional
'rules' => [], // optional
'hint_icon' => '', // optional
'hint' => '', // optional
],
'custom_field_4' => [
'type' =>'textarea', // required
'label' => 'Custom Textarea 4', // required
'placeholder' => 'Textarea', // optional
'id' => 'custom-field-4', // optional
'rows' => '3', // optional
'required' => true, // optional
'hint_icon' => '', // optional
'hint' => '', // optional
'default' => '', // optional
'rules' => [], // optional
'column_span' => 'full', // optional
],
'custom_field_5' => [
'type' => 'datetime', // required
'label' => 'Custom Datetime 5', // required
'placeholder' => 'Datetime', // optional
'id' => 'custom-field-5', // optional
'seconds' => false, // optional
'required' => true, // optional
'hint_icon' => '', // optional
'hint' => '', // optional
'default' => '', // optional
'suffix_icon' => '', // optional
'prefix_icon' => '', // optional
'rules' => [], // optional
'format' => 'Y-m-d H:i:s', // optional
'time' => true, // optional
'native' => true, // optional
'column_span' => 'full', // optional
],
'custom_field_6' => [
'type' => 'boolean', // required
'label' => 'Custom Boolean 6', // required
'placeholder' => 'Boolean', // optional
'id' => 'custom-field-6', // optional
'hint_icon' => '', // optional
'hint' => '', // optional
'default' => '', // optional
'rules' => [], // optional
'column_span' => 'full', // optional
],
]
];
If you need more control over your profile edit fields, you can create a custom component. To make this process easier, just use the artisan command.
[!NOTE] If you are not confident in using custom components, please review Filament Docs
php artisan make:edit-profile-form CustomProfileComponent
This will generate a new app/Livewire/CustomProfileComponent.php component and a new resources/views/livewire/custom-profile-component.blade.php view which you can customize.
Now in your Panel Provider, register the new component.
->plugins([
    FilamentEditProfilePlugin::make()
        ->customProfileComponents([
            \App\Livewire\CustomProfileComponent::class,
        ]);
])
composer test
Please see CHANGELOG for more information on what has changed recently.
Please see CONTRIBUTING for details.
Please review our security policy on how to report security vulnerabilities.
The MIT License (MIT). Please see License File for more information.